 INGInious
In this task we are going to see how we can implement linked list with the operations described previously. That is:
- Add an element to the start or end of the list
- Remove the first or the last element of the list
- Get the first and last elements
- Get the number of elements stored in the list
- Iterate over all elements in the list
In a nutshell linked lists are represented by nodes each with 3 fields:
- a reference to the previous element on the list
- a reference to the next element on the list
- a value
The term linked comes from the fact that these nodes are linked to one another via the previous and next references.
Additionally we will keep a reference to the first and last nodes on the list so that we can add and remove elements from the beginning and the end of the list efficiently. The reference for the first node is usually called the head of the list and the reference to the last one tail.
We believe that visualizing things is a great way to understand algorithms and data structures. So we will start by seeing what a linked list should look like on a few examples. This will make it straightforward to actually implement this data structure.
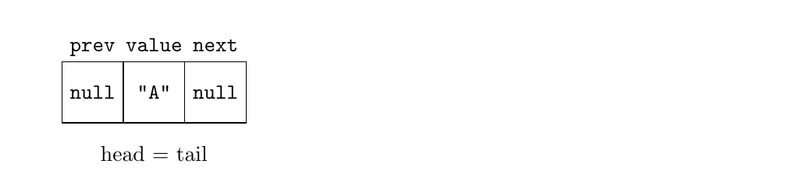
Let's start with an empty list. In this case we just have the two references head and tail will be set to null as there are no nodes to point to.

Let's assume for the sake of example that the list contains strings. After we add string "A", what should the list look like? Our implementation will add the element at the end of the list.
Well first we need a node to contains this value. Let's call this node \(A\). Also, both the first node and the last node are the same since there is only one element in the list. Therefore, both head and tail should point to the node containing "A". Finally, there is no other element in the list so both the previous and next references of this node will be null.
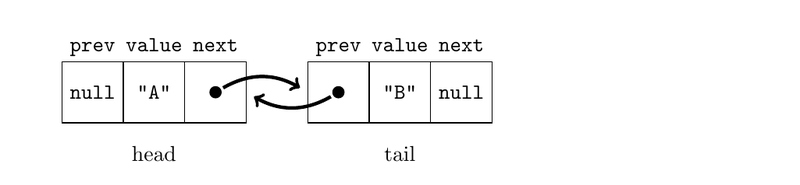
Next, assume that we add "B" to the list. We will have a new node \(B\) containing this value. The next reference of node \(A\) will point to node \(B\) and the previous reference of node \(B\) will point to node \(A\).
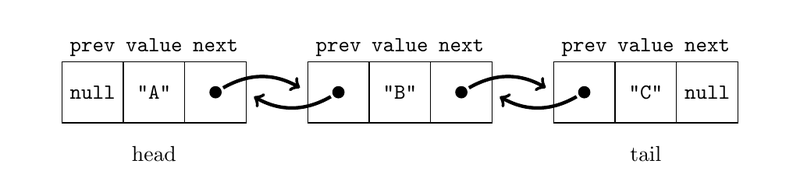
Just to make sure that everything is clear lets add one more element "C". We need to create a new node \(C\) and make the next reference of node B node point to node \(C\), make the previous node of \(C\) be \(B\) and finally make the head point to node \(C\).
This should already give you enough hints about how to implement the basic structure of a linked list with an operation to add elements. You should give it a try before reading further.
Let's start by implementing a class to represent nodes. We will implement it as an internal class of our linked list. We will call our linked list LList and it will be generic so that it can be used to contain any kind of elements. If you are not familiar with generics you can learn more about it here.
For our competitive programming needs, you do not need an in depth understanding of generics. Knowing the syntax is probably more than enough.
Very short parenthesis about generics in Java
To create a generic class, you need to add <X> in front of the class name as in class SomeClass<X>. Then you can use X as the type of variables withing the class. The type of X is then defined when you instantiate the class as in SomeClass<String> c = new SomeClass<>().
The name you use does not need to be X. It can be whatever valid identifier that you want.
You can set several generic types in your declaration. For example, class SomeClass<X, Y>. One example of a data structure that we will be using whose Java implementation uses generics is the HashMap.
So let's start creating the our linked list data structure.
As described above, we need a way to represent nodes, a pointer to the first node (head) and a pointer to the last node (tail). The nodes will be represented by an inner class of our list class so that we have access its generic type. Each node should have a pointer to the previous node (prev), next node (tail) as well as a value (value). Putting this together using a generic type we get:
public class LList<V> {

    // pointers to the first and last node
    private Node head, tail;
    private int size;

    public LList() {
        head = tail = null;
        size = 0;
    }

    public class Node {

        private V value;
        private Node prev, next;

        public Node(V value) {
            this.value = value;
        }

    }

    public int size() {
        return size;
    }

    // methods go here

}
Note that we added also a size variable to keep track of the size of the list.
So how can we implement the addLast method, which adds a new value to the end of the list? Based on the previous illustration, we can depict this operation as follows:
|
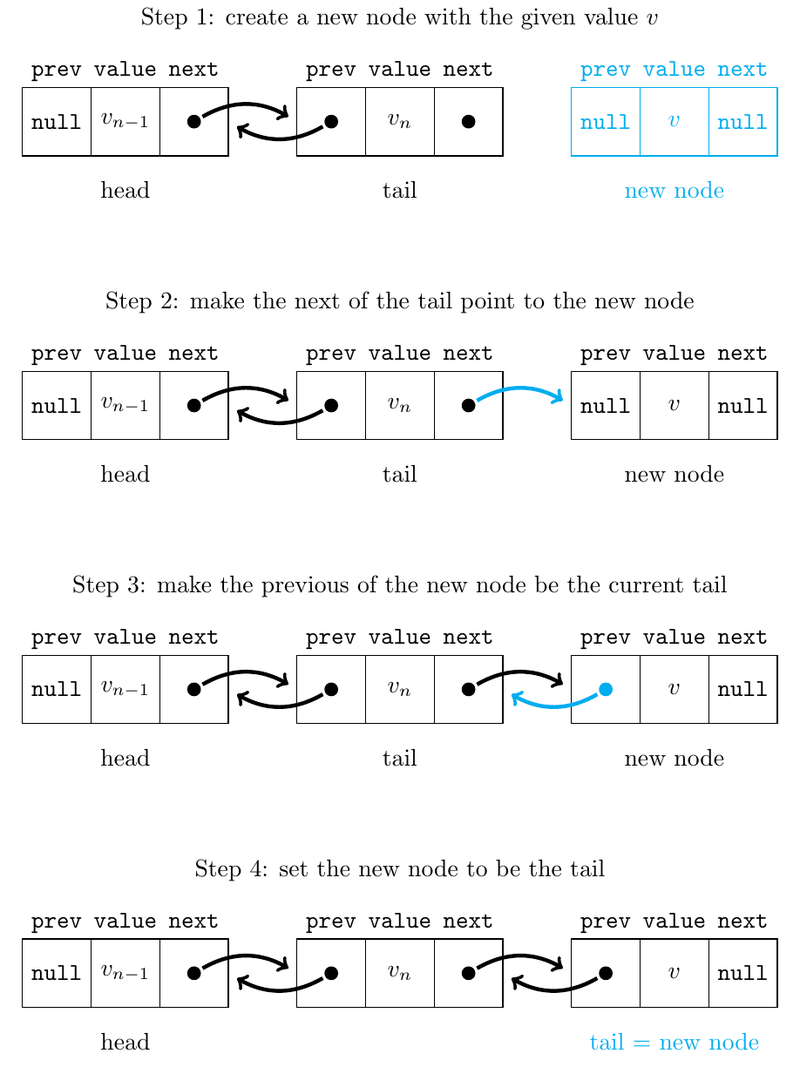
The only case that is not covered in these four steps if the case were the list is empty. This happens when both head and tail are null. In this case, we simply need to create the new node and make both the head and the tail point to it. Of course, we also need to increment the size of the list. Putting it all together we get the following function:
public void addLast(V value) {
    // step 1. create a new node with the given value
    Node node = new Node(value);
    if(tail == null) {
        // empty list case
        head = tail = node;
    } else {
        // step 2. make the next of the tail be the new node
        tail.next = node;
        // step 3. make the previous of the new node be the tail
        node.prev = tail;
        // step 4. make the new node the tail of the list
        tail = node;
    }
    // increment the size of the list
    size++;
}
How can we implement the removeLast() operation that removes the last element form the list?
First, if the list only has one element then we can simply set both head and tail to null. Otherwise, we need to make the tail point to the previous of the current tail and remove the next element of this new tail, as show in the following figure. Also, we need to decrease the size of the list.
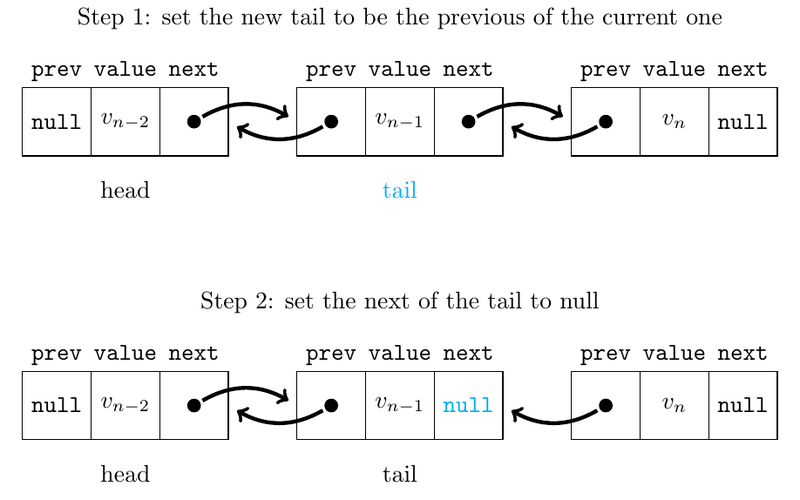
Note that some might feel that this is not super clean as we leave a useless pointer in memory (the prev of the old tail). If this bothers you, we encourage you to modify the code to your liking.
public void removeLast() {
    if(size == 1) head = tail = null;
    else {
        // step 1. set the new tail to the previous of the current one
        tail = tail.prev;
        // step 2. set the next of the tail to null
        tail.next = null;
    }
    size--;
}
Note that the following code will give a NullPointerException if called on an empty list (if \(size = 0\)).
We only have two operations left: addFirst and removeLast. Adding a node at the beginning of the list is very similar to adding it to the end, the main difference is that we will work with the head instead of the tail. The following image shows the four steps that we need to perform in order to add an element of the beginning of the list.
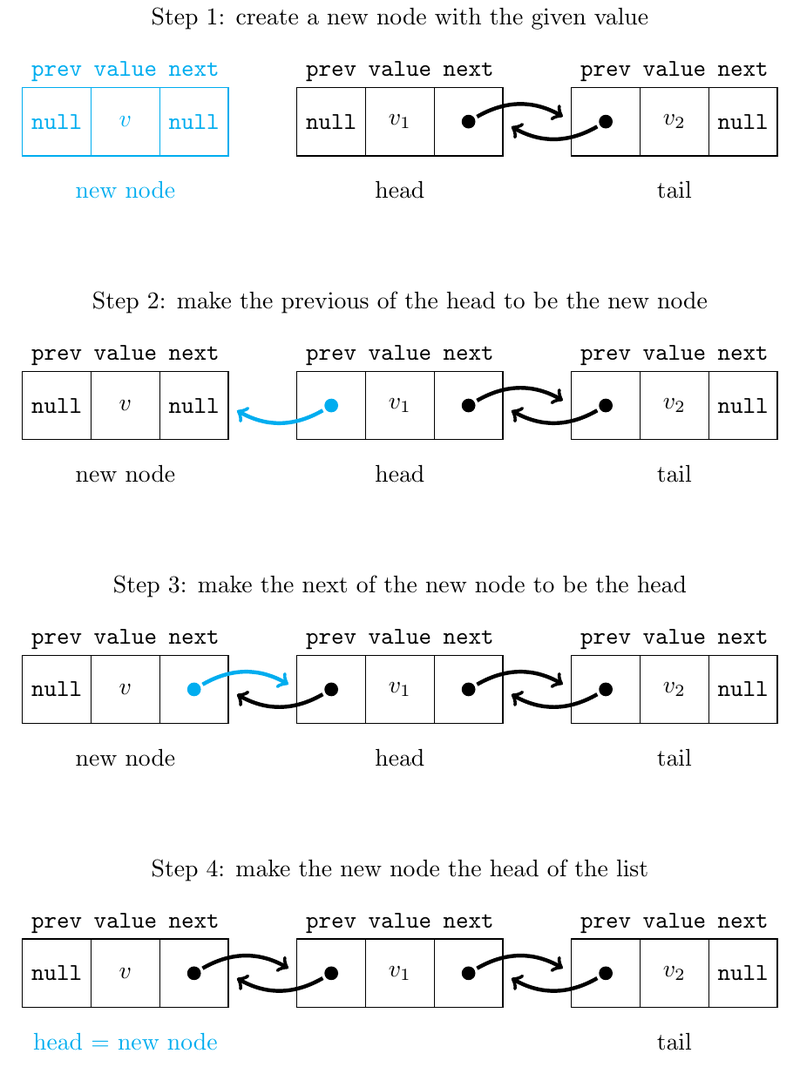
Implementing this is quite straightforward, you just need to translate the four steps into code.
public void addFirst(V value) {
    // step 1. create a new node with the given value
    Node node = new Node(value);
    if(tail == null) {
        // empty list case
        head = tail = node;
    } else {
        // step 2. make the previous of the head to be the new node
        head.prev = node;
        // step 3. make next of the new node the head
        node.next = head;
        // step 4. make the new node the head of the list
        head = node;
    }
    size++;
}
Removing the first element is also analogous to removing the last element. If we only have one element we set both the head and the tail to null. Otherwise we set the new head to be the next element of the current head and set the previous pointer of the new head to null.
public void removeFirst(V value) {
    if(size == 1) head = tail = null;
    else {
        // step 1. set the new head to be the next of the current one
        head = head.next;
        // step 2. set the previous of the head to null
        head.prev = null;
    }
    size--;
}
You can find a full implementation of our linked list in the following file. You will probably never need it. The important take aways from this class is how to implement a linked structure such as a linked list. We give you a problem so that you can practice these skills.